How 1 Architect Transformed His Family Home in Just 4 Months
Steve Ramos is passionate about design and architecture. He is the founder of the BUILDINGS ARE COOL blog, an Architect for LS3P in Charleston, S.C., and working on his first book, Breaking the Box: Explode out of Architecture School to a Successful Career as an Architect.
As my boy Mies said above, “God is in the details.”
Great architecture must have great details, just like a great shoe has fine stitching.
Looking back at the project undertaken to transform my home, I wanted to share some of the sketches and process photos of some of my favorite details. When planning our home addition, I put together a thorough set of construction drawings; in fact, one of my friends who regularly does residential design commented that I had possibly drawn too much.
Although it was true that I had a thorough set, there were still a lot of details that had to be designed during construction — I think that kind of thing is inevitable. No matter how thorough you think you have been, there will always be details popping up during construction that need design attention.

Left: the original house; right: the house after its transformation.
And … these builders were fast!!! One of the things that I enjoyed most about our renovation was the quick pace of the construction. The actual construction time fitted into a four month window. That is super fast compared to what I am use to with my professional architect job at LS3P. With my commercial projects, I would guesstimate the typical construction period for our projects to be in the 12-18 month timeframe. And I would guesstimate the design period from conception to permit in hand to also be in the 12-18 month period. That’s a long time!
So, four months for our house was like breaking the sound barrier — especially for such a dramatic transformation.

I would leave drawings taped to the kitchen table for the carpenters.
Because these dudes were so fast, I had trouble keeping up with them. There were many occasions where I would draw a detail the evening before that detail was to be constructed. In fact, there were many mornings where I worked from my kitchen table a couple hours before the guys showed up to work. I would leave the detail taped to the kitchen table and come back later that evening to find the constructed work.
Talk about instant gratification!
The set of drawings I put together for the addition were all done in Revit, but once the construction started, I began to fill in the blanks with free-hand drawings. Here were some of my favorite details that were worked out in the field … or on the fly!
Detail 1: The Entrance Gate
First impressions are important right? As part of our new addition we had a new wooden fence built around the perimeter of our property. The fence is constructed of pressure treated wood that has been stained black. You will notice in the pictures that I created a pattern of alternating 1×4’s and 1×6’s. The pattern is (2) 1×4’s, 1×6, (2) 1×4’s, 1×6, (2) 1×4’s, 1×6, etc.

Johann Wolfgang von Goethe once said, “I call architecture frozen music” — architecture can be very rhythmic, just like a song. Can you see the rhythm of our fence?
One of my go-to design tools is the paired column. I like the paired column because you can take a wider, chunkier column and break it down into more elegant proportions. It will typically have more prominence and balance than a single column. You will find paired columns in a few of my other designs. Here, you can see I paired 4 sets of columns at the Spectator Hotel as well as a similar capital detail:

The day that the carpenters were here to work on the front gate, I developed these two sketches of the cap detail and the gate itself. I was actually home on my lunch break that day:

Nothing fancy. Just hand sketches on trace paper. And here is the finished cap detail:

Detail 2: The Porch Columns
My goal with the porch columns was to keep them very simple and clean, and to add just a little touch of elegance. We used a pre-molded fiber cement drip cap on the façade of the addition. I really liked that piece, especially since it will not rot, so I came up with a detail for using it as trim around the columns.

Column fun fact: Those columns are actually hollow. There are stainless steel straps that were imbedded into the concrete slab. Those straps were fed through the center of the columns and strap into the wood beam that sits on top. The straps are sandwiched in between the multiple layers of 2×8’s that make up the beam. Here’s the finished result:

And a detail of the capital:

Detail 3: The Cased Opening
This is the detail that I am most proud of. The main connection between our old house and our new addition is a 10′ wide by 7′ tall opening. That is a very large opening especially when you consider it had to be punched through an existing brick wall.

Left: the original outer wall; right: the transformed opening and extension.
I also think that thresholds are very symbolic, especially in this case where it connects the old to the new. This seemed like a great design opportunity and I wanted to articulate the significance of this opening.

As you can see in the picture above, there is a bunch of structure hidden behind the casing. That big LVL beam is carrying the weight of the 2nd level floor joists. The LVL beam sits on the jack studs on either side and is strapped down with stainless steel straps.
The carpenters are installing a steel lintel in this picture, which carries the weight of the brick. I worked with the carpenters to develop a cased opening detail that was constructed out of birch veneer plywood. We used the birch plywood to wrap the entire opening and the columns that flanked the opening:

The corners have all been mitered so it appears to be solid chunks of wood. I actually think it looks like a modern set of Lincoln Logs:

I chose to express the joints with a 1/2″ reveal. Modern architects love reveals!

Left: the dining room before transformation; right: the completed space.
To finish it off the plywood was stained a mahogany color. I had them paint the reveals black. They loved me for that.
Detail 4: The Barn Door
Who doesn’t love a good barn door these days, right? When we started construction I declared that “I will build the barn door myself!” After all, I made our dining room table and bench as well as our coffee table once upon a time.
How hard could a simple door be? Well, not hard. But … I decided that my time was more valuable spent elsewhere and I wanted to make sure that the thing got done.

Also, I knew that the carpenter would do a great job and at this point I really loved the idea of leaving a sketch on the table and coming back later that day to see the finished work.

Detail
This is the same birch veneer plywood used on the cased opening and has the same 1/2″ reveal detail — very simple and clean. We bought the hardware from Barndoor Hardware.
Detail 5: The Butler’s Pantry
Our new butler’s pantry has not gotten much love on my blog, mostly because it is always full of junk and therefore there is never a great time to photograph it. It is also a small room making it hard to photograph. Despite its size, this little room packs a mean punch and is a key part to our addition. That countertop was cut from the quartz slab previously on our kitchen island. We had the kitchen island countertop replaced during the renovation with a white carrera quartz.
This slab is pretty unusual because it is cut on a weird geometry. Our property line is not parallel to our house and since we built just about on our property line, the western wall of our house is on an angle. One morning I was in a bit of a rush and was fresh out of trace paper. There was a bunch of mail on our counter, so I went all “MacGyver” and used an envelope to document my thoughts:
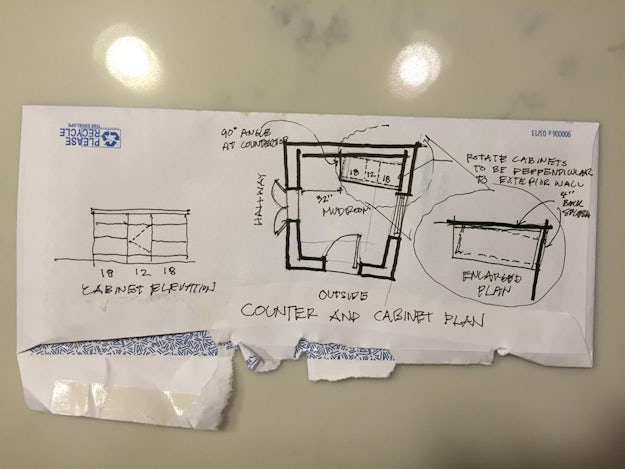
Since the room and countertop were at a wonky angle I needed to give them direction on how to set the cabinets. It was important that we set them so that the drawers would not hit the wall or refrigerator because of the acute angle.
Those blue cabinets are off-the-shelf unfinished cabinets from Lowes. We decided to pick a wacky color because that’s how we roll, son!

The window art you see hanging on our wall was from Beth Curry McConnell of Charleston Views. Beth is a friend and very talented artist. You can find Beth every Saturday morning at the Charleston Farmer’s Market or here.
One of the things I enjoy sharing the most on my blog is the process of designing architecture. Behind each design there is a story. Usually a very complex and sometimes messy story. In architecture we create all different types of drawings. Sometimes they are pretty, and sometimes they are down and dirty. Ultimately though, a good drawing conveys an idea.
I appreciate you all following us along on our house journey. In this post I shared how residential construction is super quick compared to the commercial world, how details can make a design and how the process can be the most important part of the story.
One final shout out to the team at Rogers Custom Builders. Those guys did an awesome job. Thanks to Frankie Rogers and his team of carpenters: Harrison #1, Harrison #2, Robert, Curt, Ed, Rhett and all of the painters, electricians, HVAC dudes and other folks whose names I did not get.
Cheers!
Steve
This post first appeared on Buildings Are Cool; all images courtesy Steve Ramos.
Architects: Find the perfect materials for your next project through Architizer. Manufacturers: Sign up now to learn how you can get seen by the world’s top architecture firms.
The post How 1 Architect Transformed His Family Home in Just 4 Months appeared first on Journal.
, Stephen Ramos, read more Journal http://bit.ly/2yV1XFy


Yorumlar
Yorum Gönder